< VB .NET WinForm Program Example | Main | C# & VB .NET Critical Section Examples >
Chapter 3 Part 5:
Threading and the Asynchronous Pattern
What do we have in this chapter 3 Part 5?
-
Using Thread Pools
-
Using Events to Synchronize Threads
-
Designing Critical Sections in Your Code
-
Monitor
-
Interlocked
-
C++ Critical Section Program Example
|
|
Using Thread Pools
The .NET Framework offers another way to use threading for running short program tasks by using the System.Threading.ThreadPool class. Thread pools are designed to create and maintain a pool of running threads that service delegate methods from a queue. The idea is to conserve the thread creation and deletion process when you are performing many small tasks asynchronously. The ThreadPool class is statically defined and is available to your application without instantiation. To queue up a task to a thread pool, you have to define a WaitCallback delegate method. A WaitCallback delegate method is similar to the ThreadStart delegate method we described earlier, except that WaitCallback accepts a State parameter that allows you to pass state information to your thread when it’s queued to the thread pool. The State parameter allows you to pass any object type, such as a string or even an integer, into your delegate method, which is convenient because you can pass objects that might be needed during the asynchronous operation. The following code fragment demonstrates how to create a WaitCallback delegate method. In the method, we expect an integer type to be passed in the State parameter.
C#
void MyThreadPoolMethod(object State) { // Assume an integer type was passed to the state object parameter.
int g = (int) State;
// Do something useful here }
Visual Basic .NET
Shared Sub MyThreadPoolMethod(ByVal State As Object)
' Assume an integer type was passed to the state object parameter. Dim g As Integer = State
' Do something useful here End Sub
Once your WaitCallback() method is defined, you can queue it up to the thread pool using the statically defined ThreadPool.QueueUserWorkItem() method. The following code fragment demonstrates how to identify a thread pool callback method and queue it up to the thread pool. We pass an integer value of 4 to the State parameter that will be received in the callback method. |
C#
WaitCallback CallbackMethod = new WaitCallback(MyThreadPoolMethod);
ThreadPool.QueueUserWorkItem(CallbackMethod, 4);
Visual Basic .NET
Dim CallbackMethod As WaitCallback = _New WaitCallback(AddressOf MyThreadPoolMethod);
ThreadPool.QueueUserWorkItem(CallbackMethod, 4)
Your application can queue as many tasks as you want to the thread pool queue. By default, the thread pool can run up to 25 threads per processor. It’s important that your WaitCallback() method does not block and does not take too much time to process while using one of the thread pool threads. If your method does block or takes too long to process, you’ll consume a thread in the pool and make it unavailable to process other WaitCallback() methods in the queue. If all the threads in the thread pool are busy or are blocked, the thread pool queue will continue to grow until a thread becomes available to handle the next request in the queue. As the thread pool grows, it will consume memory from your application. If the thread pool grows too large, your application can run out of memory.
Threads used in the thread pool run in the background. As we described earlier in the chapter, background threads can terminate when the main program exits. The ThreadPool class design will not allow thread pool worker threads to run in the foreground. If your main program exits while thread pool threads are running, any executing WaitCallback() methods will not run to completion, which can be bad if you have a WaitCallback() method doing something critical such as saving data to a file. One possible way to ensure that thread pool WaitCallback() methods run to completion before the main program exits is by using events to synchronize the main application thread with any thread pool threads running critical WaitCallback() methods.
Using Events to Synchronize Threads
Events are special objects that are designed to help you synchronize thread activities. Events can be defined and instantiated by using the AutoResetEvent and ManualResetEvent classes. Both classes allow you to define events to synchronize thread activities. Event objects have two operating states: signaled and non-signaled. Threads in your application can either wait on event objects to become signaled or signal an event object changing the operating state from non-signaled to signaled. For example, assume that you have two threads named A and B, respectively. Thread A can wait on a non-signaled event object until thread B signals the event object, indicating that thread B is finished doing something important. The AutoResetEvent class is designed to automatically reset an event from the signaled to the non-signaled state when a thread has finished waiting for the event to become signaled. The ManualResetEvent class, on the other hand, requires your application to reset the state from signaled to non-signaled after waiting has occurred.
The following code fragment demonstrates how to develop a thread pool WaitCallback() method named MyThreadPoolMethodWithAnEvent() that’s designed to coordinate the completion of the callback method with the calling application by using a ManualResetEvent object. The WaitCallback() method accepts a ManualResetEvent object in the State parameter. When MyThreadPoolMethodWithAnEvent() completes, it signals the passed-in manual reset event object using the event object’s Set() method.
C#
void MyThreadPoolMethodWithAnEvent(object State)
{
// Assume a manual reset event object was passed in the State parameter
ManualResetEvent MRE = (ManualResetEvent) State;
// Do something useful here
// Signal the manual reset event object when the callback routine is finished
MRE.Set();
}
Visual Basic .NET
Shared Sub MyThreadPoolMethod(ByVal State As Object)
' Assume a manual reset event object was passed in the State parameter
Dim MRE As ManualResetEvent = CType(State, ManualResetEvent)
' Do something useful here
' Signal the manual reset event object when the callback routine is finished
MRE.Set()
End Sub
Once WaitCallback() is defined, the main program thread can wait for the manual reset event handle to be signaled, indicating that the WaitCallback() routine has completed its work.
The following code fragment shows how to set up the manual reset event handle for the MyThreadPoolMethodWithAnEvent() callback routine. The code waits on the ManualResetEvent handle to become signaled by using the WaitHandle.WaitAll() method. The WaitHandle.WaitAll() method can wait on one or more handles to become signaled before the method returns. In this code, we only wait on one handle to become signaled.
C#
WaitCallback CallbackMethod = new WaitCallback(MyThreadPoolMethodWithAnEvent);
// Create an array of wait handle objects to wait on
WaitHandle [ ]WaitHandleArray = new WaitHandle[1];
// Assign a manual reset event object to the array
WaitHandleArray[0] = new ManualResetEvent(false);
// Pass the manual reset event object to the wait callback method
ThreadPool.QueueUserWorkItem(CallbackMethod, WaitHandleArray[0]);
// Wait for the callback method to complete
WaitHandle.WaitAll(WaitHandleArray);
Visual Basic .NET
Dim CallbackMethod As WaitCallback = New WaitCallback(AddressOf MyThreadPoolMethod)
' Create an array of wait handle objects to wait on
Dim WaitHandleArray(1) As WaitHandle
' Assign a manual reset event object to the array
WaitHandleArray(0) = New ManualResetEvent(False)
' Pass the manual reset event object to the wait callback method
ThreadPool.QueueUserWorkItem(CallbackMethod, WaitHandleArray(0))
' Wait for the callback method to complete
WaitHandle.WaitAll(WaitHandleArray)
If you have more than one WaitCallback routine running in the thread pool, you can expand WaitHandleArray to manage multiple event objects at the same time.
Designing Critical Sections in Your Code
When your application uses multiple threads, there’s a good chance that you’ll have a section of code or even multiple sections of code that read or write something to an object that is shared by multiple running threads. For example, your application might be writing to a shared byte array buffer or even to a shared integer variable. If your application is designed to modify and reference a shared object from multiple threads, you’ll have to coordinate access to the shared object and design a critical section of code. There are two useful classes, Monitor and Interlocked, that can help you coordinate access to objects in your code.
Monitor
The .NET Framework provides a useful class named Monitor in the System.Threading namespace that enables you to synchronize access to objects that are shared by multiple code paths. Monitor enables you to design a critical section in your code where you can access and modify an object without having other threads access your object at the same time. This critical section is important because you might have a group of variables that get updated in one thread while another thread might access your variables but expects a complete update before it reads the variables.
To use Monitor effectively, you have to acquire a monitor lock to an arbitrary object such as the object you’re trying to protect by taking the following steps:
- Call Monitor.Enter() using some object to acquire a monitor lock.
- Update or access your shared object safely.
- Call Monitor.Exit() to release the monitor lock on the object.
The following code fragment demonstrates these steps using a byte array object named Buffer. The code uses the shared Buffer object as a monitor lock and also updates the shared Buffer object safely between the Enter() and Exit() calls.
C#
byte [ ] Buffer = new byte[32];
Monitor.Enter(Buffer);
for (int i = 0; i < Buffer.Length; i++)
{
Buffer[i] = 1;
}
Monitor.Exit(Buffer);
Visual Basic .NET
Shared m_Buffer(32) As Byte
Monitor.Enter(Buffer)
Dim i As Integer
For i = 0 To Buffer.GetUpperBound(0) - 1
Buffer(i) = 1
Next
Monitor.Exit(Buffer)
When multiple threads call Enter() using the same object to acquire a monitor lock, only one thread will have Enter() complete and the other threads will block on the Enter() call. The thread that has Enter complete acquires a monitor lock on the object that was passed to Enter(). Once the thread has completed work on the shared object at hand, it must release the monitor lock by calling Exit(). Once the monitor lock is released, other threads can attempt to acquire a monitor lock on the object at hand.
Interlocked
The .NET Framework also features another useful class named Interlocked that can help you increment and decrement shared integer variables and perform safe atomic assignments of shared objects safely from multiple threads. Interlocked features two methods: Increment() and Decrement(). Increment() adds 1 to an integer, and Decrement() subtracts 1 from an integer. For example, the following code fragment shows how you can safely increment and decrement an integer by 1:
C#
int i=5;
Interlocked.Increment(ref i);
Interlocked.Decrement(ref i);
Visual Basic .NET
Dim i As Integer
Interlocked.Increment(i)
Interlocked.Decrement(i)
Interlocked also lets you perform safe atomic assignment of object values by using the Exchange() method. For example, assume that you have two objects named A and B, and you want to safely copy the contents of object B into object A. Exchange() lets you pass in as parameters two objects of the same type and copies the content of the second parameter safely into the first parameter. For example, the following code fragment shows how to exchange two integer values safely:
C#
int A = 65
int B = 88
Interlocked.Exchange(ref A, B);
Visual Basic .NET
Dim A As Integer
Dim B As Integer
A = 65
B = 88
Interlocked.Exchange(A, B)
When the code fragment runs, A will contain the contents of B. The nice thing about the Interlocked class is that you can safely perform operations that modify variables with very little code.
C++ Critical Section Program Example
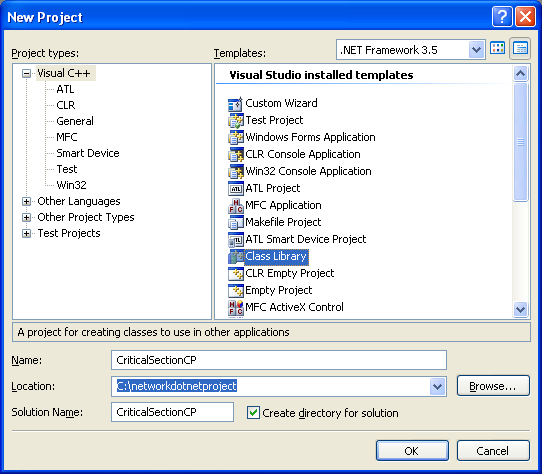
Create a new class library project and you might want to use CriticalSectionCP for the project and solution names as shown below.
 |
|
Add the following code for class definition (CriticalSectionCP.h file).
|
// CriticalSectionCP.h
#pragma once
using namespace System; using namespace System::Threading;
namespace CriticalSectionCP {
public ref class Class1 { static array< Byte >^ m_Buffer = gcnew array< Byte >(32);
public: static void MyBufferWriter1() { Console::WriteLine("\nIn MyBufferWriter1()...Enter(), assign 1, Exit() & Sleep(300)..."); try { for (int j = 0; j < 420; j++) { Monitor::Enter(m_Buffer); for (int i = 0; i < m_Buffer->Length; i++) { m_Buffer[i] = 1; }
Monitor::Exit(m_Buffer); Thread::Sleep(300); } } catch (ThreadAbortException^ e) { Console::WriteLine("MyBufferWriter1 caught abort exception: " + e->Message); } }
public: static void MyBufferWriter2() { Console::WriteLine("\nIn MyBufferWriter2()...Enter(), assign 2, Exit() & Sleep(400)..."); try { for (int j = 0; j < 420; j++) { Monitor::Enter(m_Buffer); for (int i = 0; i < m_Buffer->Length; i++) { m_Buffer[i] = 2; }
Monitor::Exit(m_Buffer); Thread::Sleep(400); } } catch (ThreadAbortException^ e) { Console::WriteLine("MyBufferWriter2 caught abort exception: " + e->Message); } }
public: static int TestEntryPoint() { ThreadStart^ ThreadMethod1 = gcnew ThreadStart(&Class1::MyBufferWriter1); ThreadStart^ ThreadMethod2 = gcnew ThreadStart(&Class1::MyBufferWriter2); Thread^ MyThread1 = gcnew Thread(ThreadMethod1); Thread^ MyThread2 = gcnew Thread(ThreadMethod2);
Console::WriteLine("Instantiating ThreadStart & Thread objects...");
try { Console::WriteLine("In Main()..."); MyThread1->Start(); Console::WriteLine("Start() for MyThread1 is OK..."); } catch (Exception^ e) { Console::WriteLine("The thread failed to start with error: " + e->Message); }
try { MyThread2->Start(); Console::WriteLine("Start() for MyThread2 is OK..."); } catch (Exception^ e) { Console::WriteLine("The thread failed to start with error: " + e->Message); }
Console::WriteLine("\nLooping - writing for both buffers, Enter(), Write(), Exit() & Sleep(200)..."); for (int i = 0; i < 10; i++) { Console::WriteLine("Pass #" + i.ToString()); Monitor::Enter(m_Buffer);
for (int j = 0; j < m_Buffer->Length; j++) { Console::Write(m_Buffer[j].ToString()); }
Console::WriteLine(); Monitor::Exit(m_Buffer); Thread::Sleep(200); } Console::WriteLine("Aborting both threads..."); MyThread1->Abort(); MyThread2->Abort(); return 0; } }; } |
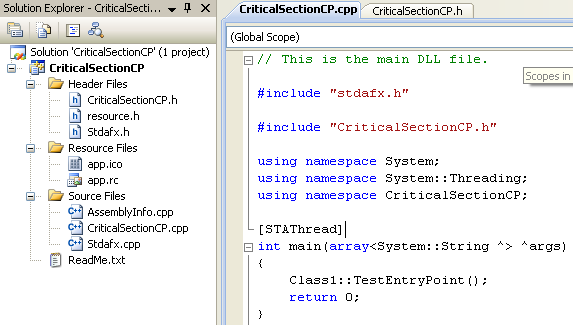
And add the main() code in the CriticalSectionCP.cpp file for testing.
|
// This is the main DLL file.
#include "stdafx.h"
#include "CriticalSectionCP.h"
using namespace System; using namespace System::Threading; using namespace CriticalSectionCP;
[STAThread] int main(array<System::String ^> ^args) { Class1::TestEntryPoint(); return 0; } |
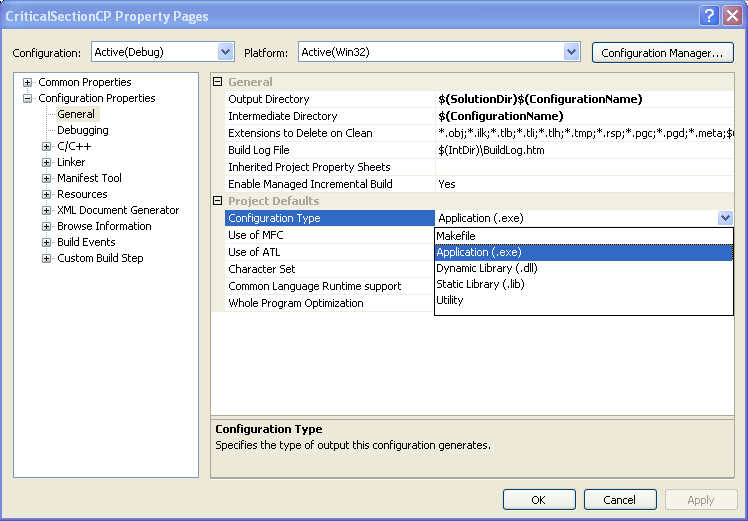
Change the application from DLL to Application type program. Select the project folder > Right click mouse > Select Properties context menu.
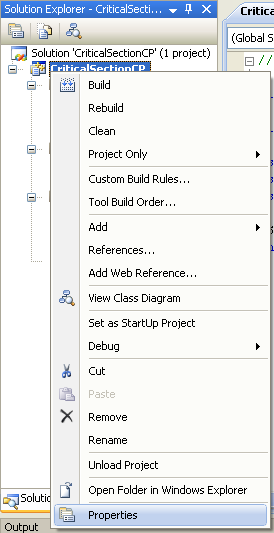
Change the Configuration Type from Dynamic Library (.dll) to Application (.exe). In this case, both DLL and .exe were generated.
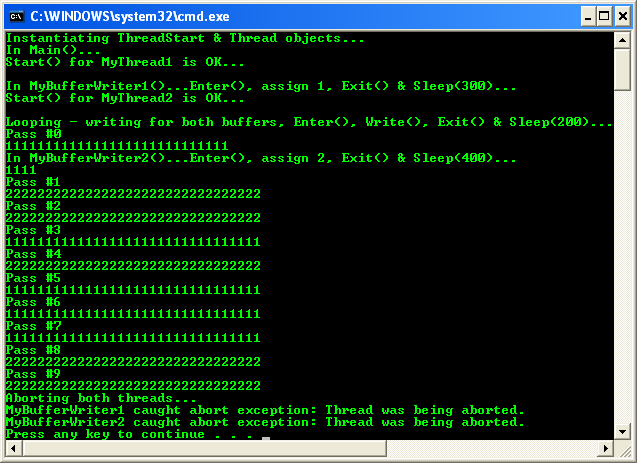
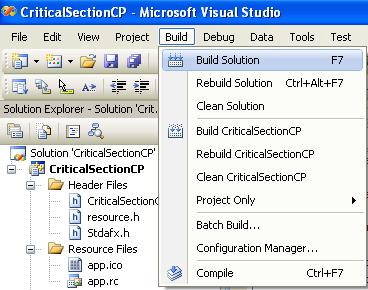
Build and run the project.
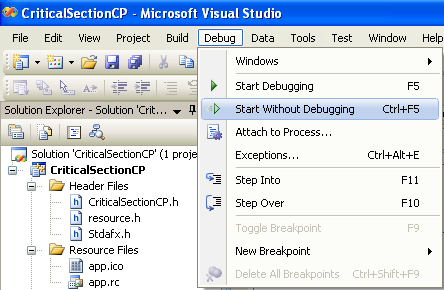
The following is the sample output.